
After receiving numerous inquiries from customers using WP Engine‘s hosting platform about staging site deployments, I decided to explore the process myself and share my findings in this brief article. Please note that the recommendations provided here may not be universally applicable, so it’s essential to conduct your own testing before implementing any changes in your production environment.
Introduction
In the early days of the WPO365 | LOGIN plugin back in 2018, I received multiple support requests from customers hosting their websites on WP Engine. The platform’s aggressive caching caused issues with the plugin’s functionality, and synchronizing users with Entra’s Provisioning Service was problematic due to WP Engine’s security measures removing the Authorization header. Additionally, their Smart Plugin Manager required unhindered access, which made it necessary to allow certain IP addresses to bypass SSO. So it was time to purchase one of their plans and ensure that the plugin is WP Engine compatible. Today I’ll explore another WP Engine feature, namely to stage site deployments.
Creating a staging site
The productive site at https://wpo365.wpengine.com/ had been a bit neglected by me, so I started by adding a new environment based on the existing productive site.

After the new staging environment had been created at https://wpo365stg.wpenginepowered.com/ I logged on to the new site’s backend.
Make sure that you wait for the email from WP Engine informing you that the site is ready for use, or else URLs in the database may not have been updated yet.
I first checked the installed plugins and added the premium WPO365 | INTEGRATE plugin, to be able to enjoy all the benefits WPO365 has to offer and activated the license key.
Due to WP Engine’s aggresive caching, I needed to refresh all cache before the WPO365 > Licenses sub menu became visible. To do so, select the corresponding link under the WP Engine Quick Links header in the top WP Admin bar.
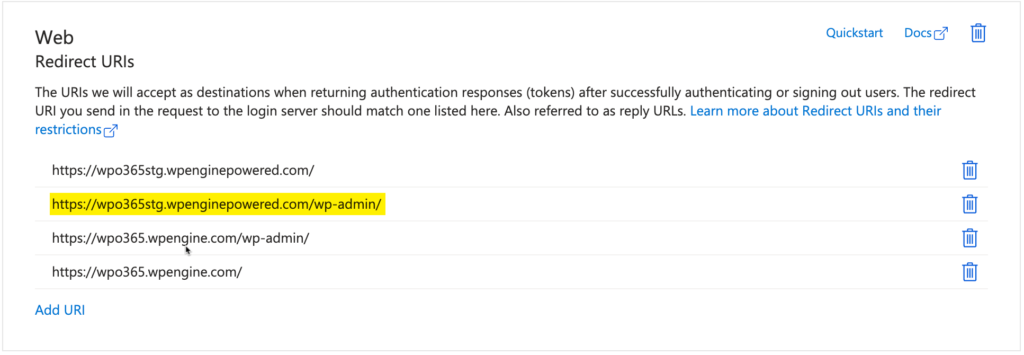
I reviewed the WPO365 configuration – which is stored in the WordPress options table and appeared to be fully intact – and noted that the Redirect URLs had been updated to reflect the staging site’s URL. At this point, I clicked the link View in Azure Portal on the plugin’s Single Sign-on configuration page, to view the registered Redirect URIs for the App Registration in Entra ID.
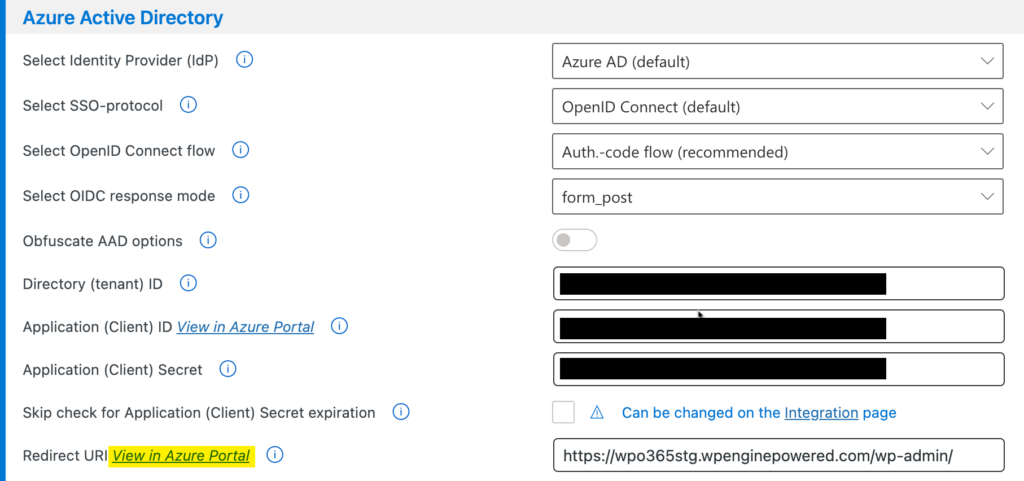
Since the staging site’s Redirect URL was not registered, I added it to the list of Redirect URIs for the Web platform configuration and saved the changes.
I continued to the plugin’s Mail configuration page and configured WPO365’s built-in mailer to send WordPress emails using Microsoft Graph (see this tutorial). I confirmed that it worked as expected by sending a test email.
To test whether (OpenID Connect based) SSO was working as expected, I continue to the plugin’s Plugin self-test page and started the test, authenticated with a test account and reviewed the result. As it turned out, the Application (Client) Secret had just expired a few days ago. Therefore I returned to the App Registration in Entra / Azure Portal, navigated to the Certificates & secrets page, deleted the expired secret and created a new one. I copied the Value of the new secret (not the ID) and updated the Application (Client) Secret option on the plugin’s Single Sign-on configuration page. I repeated the Plugin self-test and now this time everything was working as expected.
Pushing changes to production
Since SSO and sending emails using Microsoft Graph were working as expected in the staging environment, it was time to pull the changes back to production. This can be done by selecting the option to Actions > Pull from as shown below.

After receiving an email that Copy site completed successfully, I logged in the productive site’s backend using local WordPress credentials. I again reviewed the WPO365 configuration – which appeared to be fully intact – and noted that the Redirect URLs had been updated to reflect the productive site’s URL. I navigated to the Plugin self-test, ran it, and all seemed to be working as expected. I continued to the plugins Mail configuration page and checked the authorization status that is being displayed next to the Authorize button. Since the status read Authorized I sent a test email, which was received just fine.
In short, staging site deployments using WP Engine’s hosting platform with WPO365 are performing even better than I anticipated!
Please note that if you are using a premium WPO365 plugin, you may need to manually activate the WPO365 license key for production. To do this, navigate to WP Admin > WPO365 > Licenses, enter the license key, and click to activate it. If your license key does not permit multiple activations, then you’re advised to first deactivate the license key in your staging environment. To deactivate a license key, go to WP Admin > WPO365 > Licenses and click Deactivate.